


After selecting the form to submit, the wizard will walk the user through the process of providing the information required by the issuing department or program, submitting the form. Each step included in this process is detailed below.
 |
The sections present for a given form, will depend on the needs and configuration of the form in question. |
|
Please note that a form must be officially certified, submitted by the submitter for it to be available for review by agency staff. The agency will not have visibility or access to draft forms that are not yet submitted. |
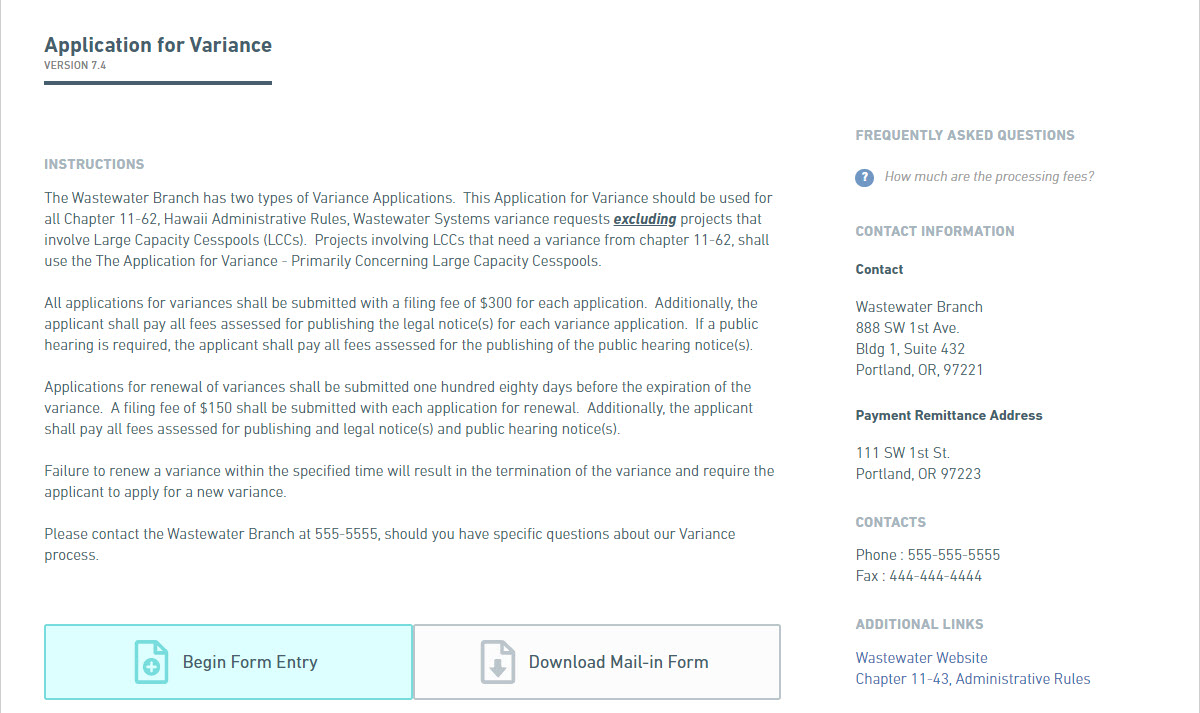
 Form Instructions
The Form Instructions provides the user with information specific to the selected form and information pertinent to processing submissions of this form type. Click Begin Form Entry button to start a new online submission.
|
When available, the user has the option to download a paper based, mail-in, submission form. This option can be utilized by clicking on the Download Mail-In Form button, if visible. |
|
Typically, a user will need to be signed in to the system prior to submitting a form. When enabled, the user will have the option to submit a form as a guest (without signing in to the system). This option can be utilized by clicking on the submit as a guest link, if visible, which will be displayed where the Begin Form Entry button is normally displayed. If present, the user can click upon the Upload [Dataset Name] button to select and attempt to upload a compliant XML submission for the form. The selected files format will be validated and if value, the provided data will be populated on to the form. The XML format must be compliant with the form design.
If present, the user can click upon the Download Mail-In Form button to download a PDF version of the form for offline entry, population and review. This form will be mailed back to the agency as instructed within the form. Note: processing of these mail-in forms can be slower than when using of the online system. If present, the user can click upon the Print Blank Form button to download a PDF version of the form that can be used for reference and investigatory purposes only. This form is not intended to be used as a mail-in form and may not be accepted by the agency, if received in this format. |
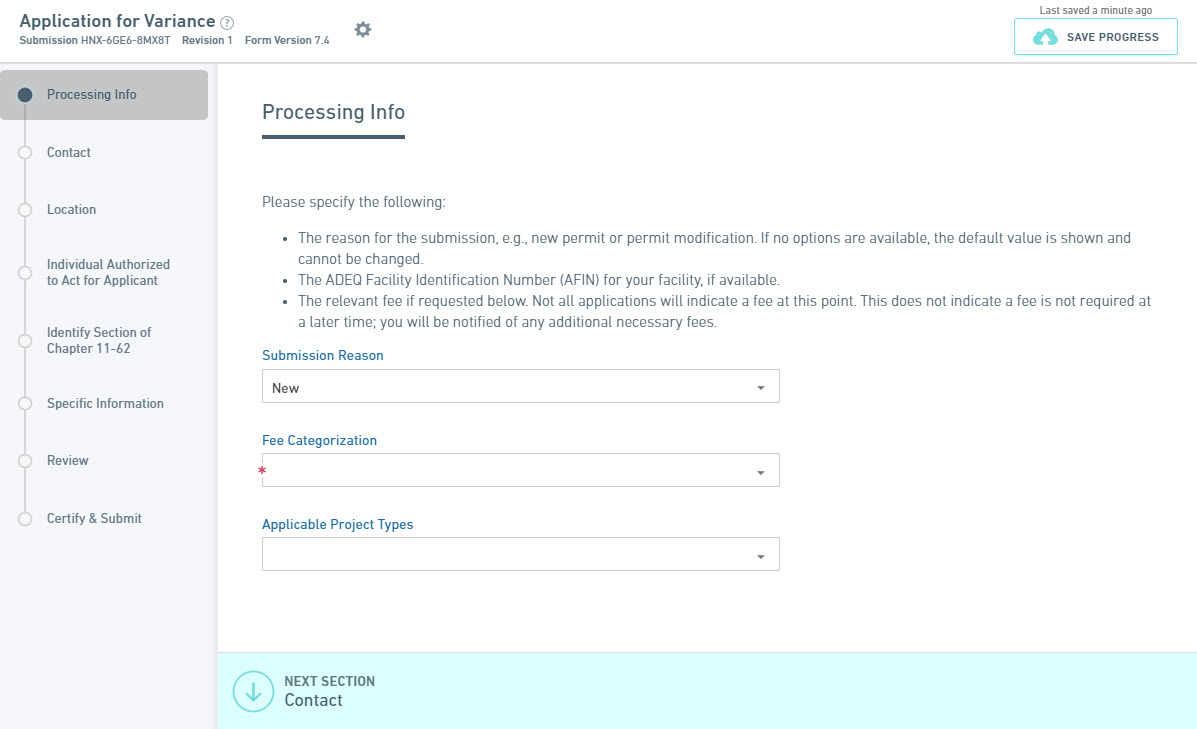
Processing Info Section
If present, the Processing Info section allows the user to provide generic processing information about the form submission, as required and select the fee categorization, if applicable. When comfortable with the information provided and displayed, click Next Section button to move to the data entry sections in the process.
|
At any time, the Save Progress button can be clicked to save the form submission in its current state and conclude data entry for the time being. The submission wizard can reopened by clicking on the History link at the top of the form and selecting the Edit button next to the appropriate form submission. |
 |
Navigate between sections using the Next Section buttons, at the bottom of the wizard or by clicking on a section name in the left panel. |
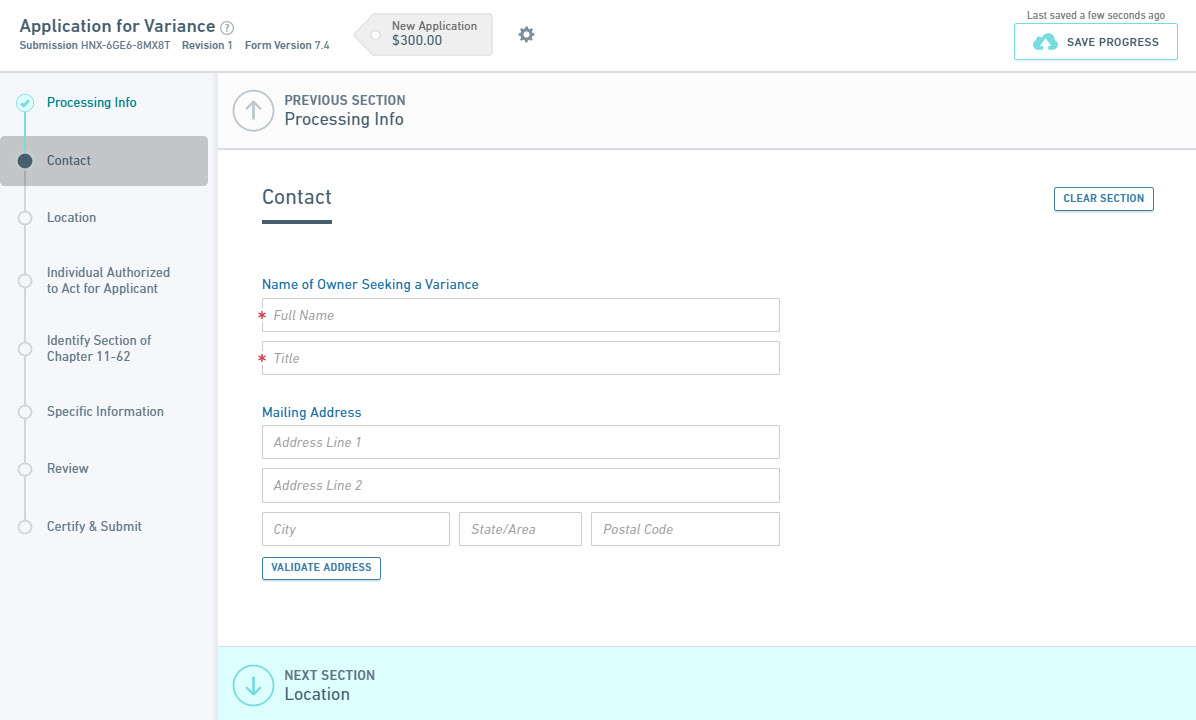
Data Entry Sections
During the Data Entry Sections of a form submission, you will be required to provide the information as specifically requested by the form. A form will be divided into one or more data entry sections that are relevant to the form in question. The user is not required to be complete a section to navigate to other sections of the form.
To complete data entry, all questions will need to be reviewed and answered with valid entries. All required fields must be entered. Required fields will be marked with a yellow or red asterisk in the upper left corner of the field.
As an indication of the status for each section (sections are listed on the left), the following visual cues are provided by the system:
![]() A white circle represents a section that has not yet been validated.
A white circle represents a section that has not yet been validated.
 A black circle represents a section that is currently in use.
![]() A red X represents a section with missing or invalid data entered.
A red X represents a section with missing or invalid data entered.
 A blue check mark represents a section that has all required information filled out and no invalid entries.
|
At any time, the Save Progress button can be clicked to save the form submission in its current state and conclude data entry for the time being. The submission wizard can reopened by clicking on the History link at the top of the form and selecting the Edit button next to the appropriate form submission. |
|
Navigate between sections using the Previous Section and Next Section buttons, at the top and bottom of the wizard, respectively, or by clicking on a section name in the left panel. |
|
The data entry sections may present several different types of questions to capture the data that is required for submitting a particular form. |
|
At any time, the Save Progress button can be clicked to save the form submission in its current state and conclude data entry for the time being. The submission wizard can reopened by clicking on the History link at the top of the form and selecting the Edit button next to the appropriate form submission |
|
Navigate between sections using the Previous Section and Next Section buttons, at the top and bottom of the wizard, respectively, or by clicking on a section name in the left panel. |
|
The data entry sections may present several different types of questions to capture the data that is required for submitting a particular form. |
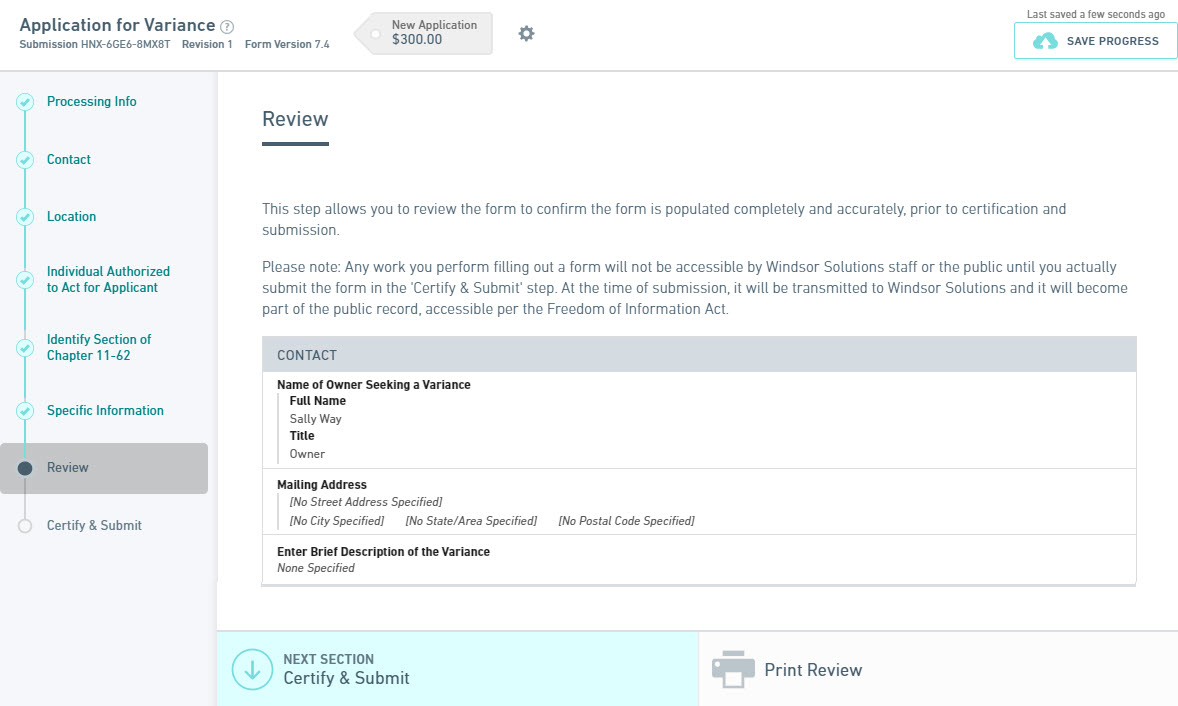
Review Section
If present, the Review section provides the user with the opportunity to review and inspect the information entered prior to submission. The user has the ability to print the form submission from this location by clicking the Print Review button, if a physical copy is desired for reviewing purposes. If the information provided is deemed accurate and complete, click Certify & Submit/Signing to move to the Certify & Submit/Signing section in the process.
|
At any time, the Save Progress button can be clicked to save the form submission in it's current state and conclude data entry for the time being. The submission wizard can reopened by clicking on the History link at the top of the form and selecting the Edit button next to the appropriate form submission |
|
Navigate between sections using the Previous Section and Certify & Submit/Signing buttons, at the top and bottom of the wizard, respectively, or by clicking on a section name in the left panel. |
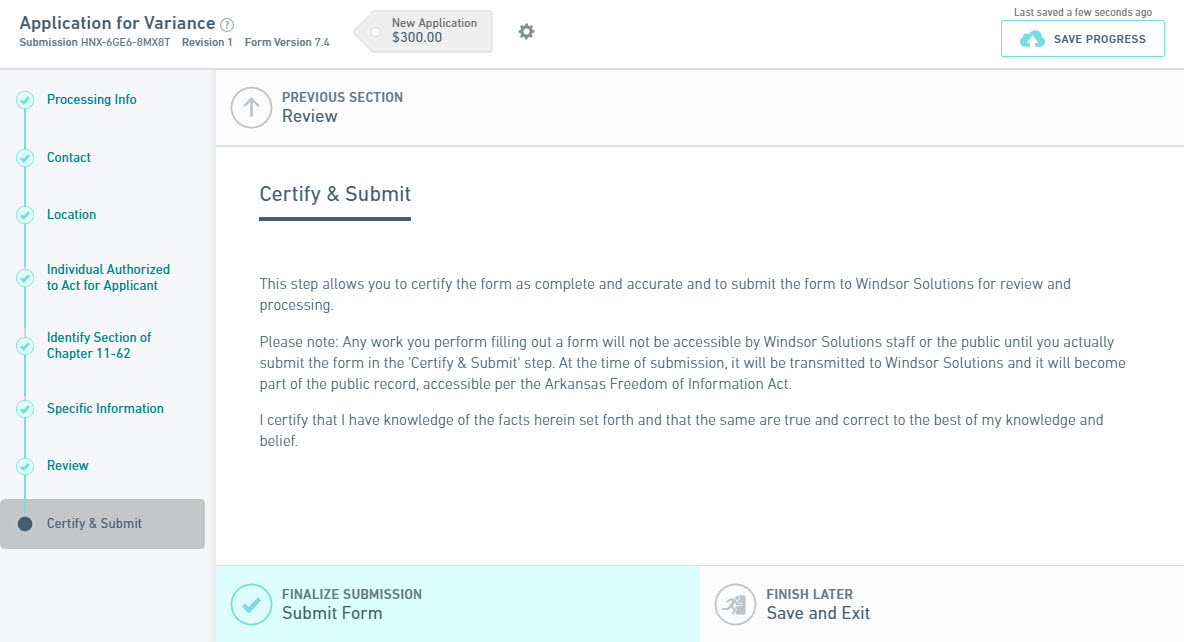
Certify & Submit/Signing Section
Depending on the certification/signing requirements for the form, this section may be presented differently. The two primary presentations include: Certify & Submit or Signing. Certify & Submit includes a standard certification agreement prior to submission. Signing includes a more stringent electronic/digital signature feature. Examples of each are presented below.
Certify & Submit
In the Certify & Submit section, the user will acknowledge the certification statement and certify the submission by clicking the Certify and Submit button. If the form has a fee and payment is required, the user will proceed to the Payment section, otherwise the user will be navigated to the Submission Confirmation section.
|
The Finish Later - Save and Exit button can be clicked to save the form submission in its current state and conclude data entry for the time being. The submission wizard can reopened by clicking on the History link at the top of the form and selecting the Edit button next to the appropriate form submission. |
 |
Please note that some forms require payment prior to considering the form submitted. In these cases, payment must be received for agency staff to have access to your submission. |
Signing
In the Signing section, the user may be offered the option of providing a digital signature (online) or hard copy signature (physical paper signature).
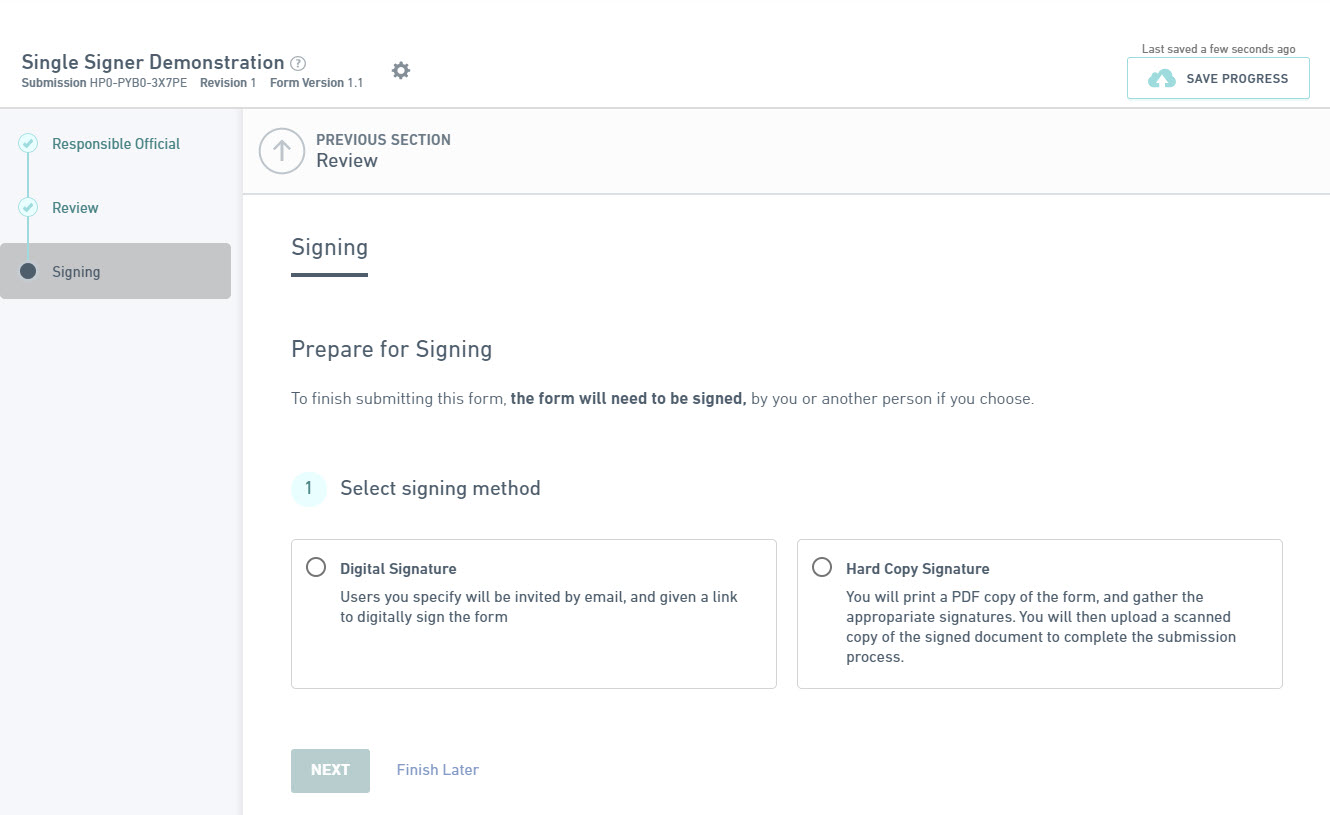
When Hard Copy Signature is selected, the user will be presented with the Download Certification Form button where the form can be downloaded, printed, reviewed, signed and returned to the agency.
When Digital Signature is selected, the user will be walked through the invitation and signing process. These steps will be followed as a part of this process:
- Click Next to navigate to the Choose Signers step.
- When a single signature is required, the user will select who will sign the submission (Me or Someone else).
- When Me is selected, the user will be required to acknowledge several submission agreement statements and sign the submission by entering their account password, answering a security question and clicking the Sign button.
The Sign button will not be disabled until all acknowledgements are acknowledges and the users password/challenge question is provided.
- When Someone else is selected, the user will be presented with the roles required for signature (if more than one). Click Next button if presented with required roles. The user will be provided with the ability to invite others to sign the submission. The user will provide the signor(s) email address and any special instructions. Upon clicking the Send Invite button, signing invitation(s) will be sent to the invitee(s). The invited signers will be required to click on the link on their invitation email (or open the submission and navigate to the signing area) to sign the submission. The invited signers will be presented. This signers user will be required to acknowledge several submission agreement statements and sign the submission by entering their account password, answering a security question and clicking the Sign button.
The Send Invite button will not be disabled until signer email(s) are provided.
Once signings have occurred, if the form is reopened for editing (e.g., user clicks on the Continue Editing Draft button), all current signings will be removed from the submission.
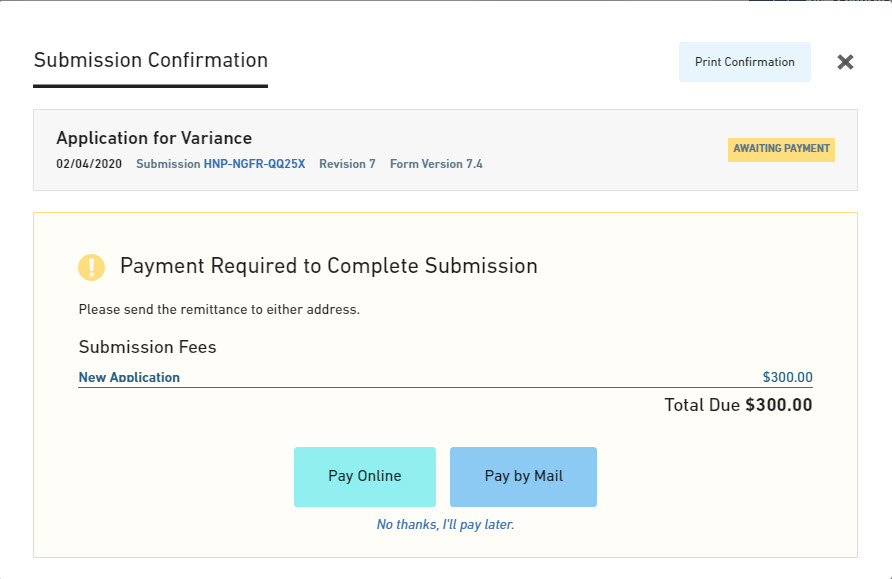
Submission Received/Completed Section
This Submission Received/Completed section confirms that the form submission was successfully submitted to the agency, displays the unique Submission # assigned to this submission for tracking purposes, any fees charged applied to the submission. In addition, this section provides a means of paying any applicable fees for the form submission, if applicable. The fees due will be displayed in the Fee Details section on the page and means for paying the fees will be presented.
|
If the form does not require a fee, this Submission Received section will be skipped and the user will be navigated to the Submission Complete section. |
Pay by Mail: If payments by check are accepted, click the Pay by Mail button and a printable form for making such a payment will be displayed. If not prepared to make a payment at this time, click the No thanks, I'll pay later option to continue. Please note that your submission will not begin processing until payment in full is received and cleared.
No thanks, I'll pay later: If you are not prepared to make a payment at this time, click the No thanks, I'll pay later option to continue. Please note that your submission will not begin processing until payment in full is received and cleared.
|
At this point in the process, the form is considered submitted and is visible within the agency. The form submission will not be reviewed and processed until payment is received for the form submission. |
 See Also
Managing Your Submission(s)
Manage Your Submission